
How to install a bidet sprayer
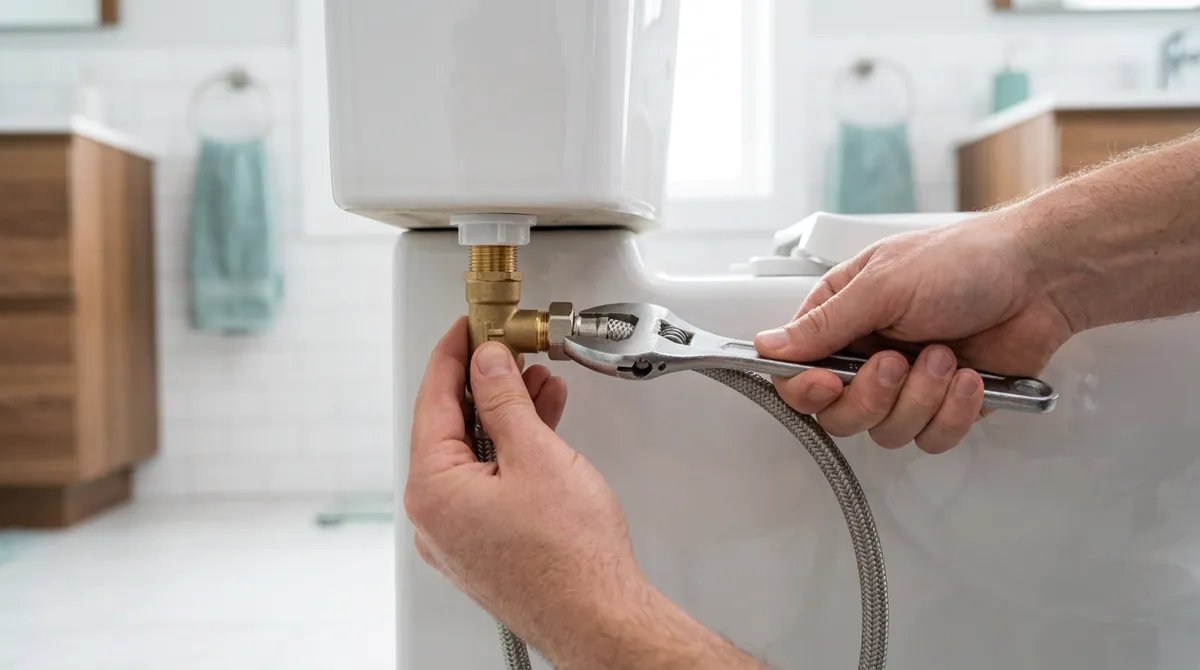
Installing a handheld bidet sprayer takes most people ten to thirty minutes and one adjustable wrench. It's the same job whether you call it a bidet spray, jet spray, shattaf, bidet shower, hand bidet or bum gun. You shut off the toilet's supply valve, drain the tank, unscrew the supply line where it meets the fill valve underneath, thread a T-valve onto that same connection, run the supply line back to the T-valve's bottom port and the sprayer hose to its side port, mount the holster, and turn the water back on. There is no electricity, no seat to remove, and nothing you can't undo in five minutes when you move out.
That makes fitting a bidet spray a genuinely different job from installing a bidet seat, even though both tap the same fill line. An electric seat install involves unbolting your old toilet seat, fitting a mounting plate, and finding a grounded outlet within reach. A handheld skips all of that — the sprayer hangs on the wall or clips to the tank, and your existing seat never comes off. Brondell's own installation guide puts the whole job at 30 minutes or less with an adjustable wrench and optional plumber's tape. Purrfectzone walks through eight steps and gives the same ballpark.
The install is the easy part. The thing worth reading this page for is what happens afterward: unlike a bidet seat, a handheld leaves a pressurized hose sitting in your bathroom all day, with a hand trigger as the only thing holding the water back. Both Brondell and Purrfectzone tell owners to close the T-valve's shut-off between uses — Brondell notes that pressure remains in the line even after you release the trigger, and that a connection left live can leak or flood. Buying a T-valve that has its own shut-off, and getting into the habit of using it, matters more than anything you do with the wrench.
Still choosing a kit? See the handheld sprayers we'd actually buy.
See our picks →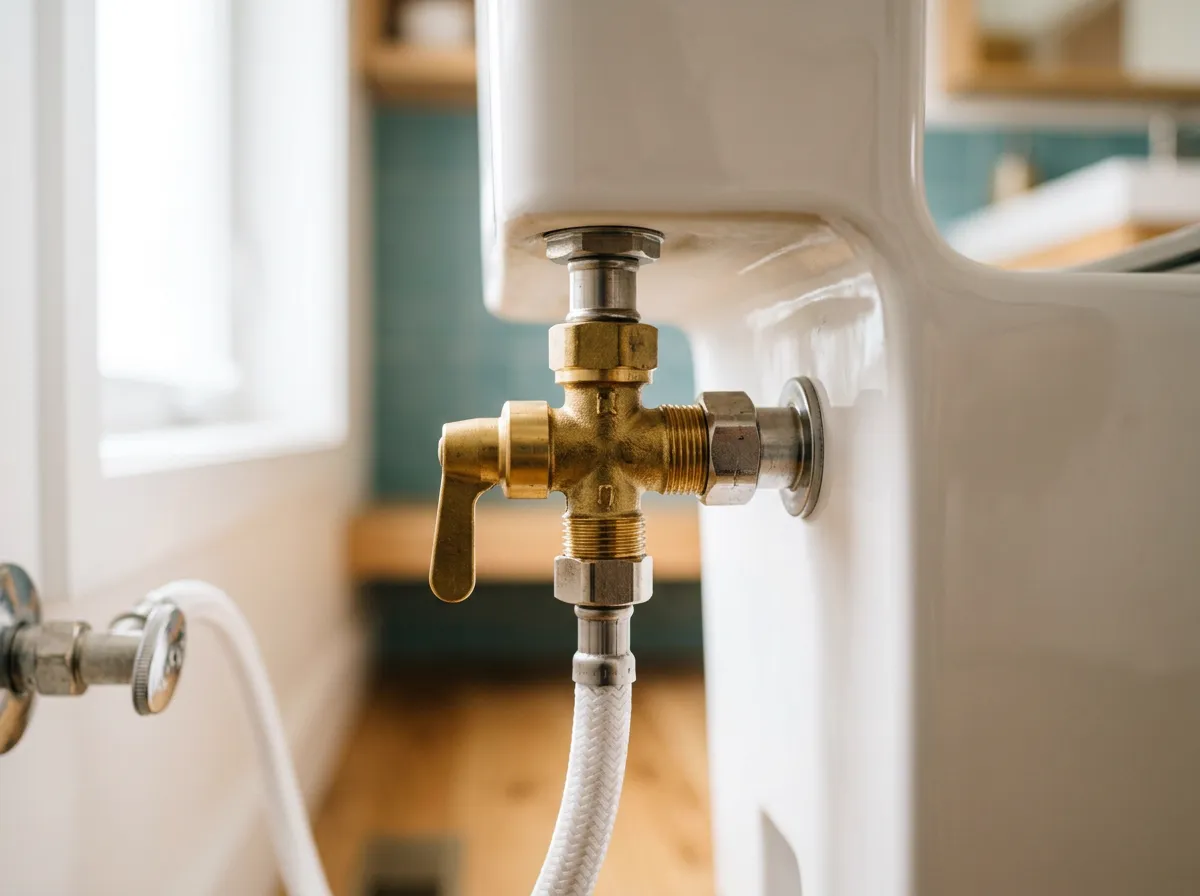
What you'll need
- The kit itself — sprayer head, braided hose, T-valve, and a holster with screws and anchors
- Adjustable wrench (or pliers with padded jaws) for the supply-line nut
- Old towel and a small bucket — the line and tank hold residual water
- PTFE plumber's tape — optional, and only if a joint weeps after you've re-seated it
- Drill and a bit sized for the wall anchors, only if you're wall-mounting the holster
- A flashlight or phone light — the fill-valve connection sits in the dark behind the bowl
Step by step
- Check the T-valve has its own shut-off before you buy. This is the one decision you make before any tool comes out. A handheld sprayer keeps its hose under mains pressure permanently, so the T-valve is what lets you isolate it. Brondell's replacement T-valve is described as a brass-core valve with a water shutoff for protection between uses; Purrfectzone's install guide tells you to orient the on/off lever facing outward so you can reach it easily. If a cheap kit ships a plain plastic tee with no lever, that is the part to replace, not the sprayer. Check this on the product page rather than discovering it when the box is open.
- Confirm the connection under your tank is a standard one. The T-valve threads onto the fill-valve shank — the plastic or brass stub poking out of the bottom of the toilet tank, where the supply line from the wall screws on. Brondell lists that end of its T-valve as a 7/8-inch ballcock connection, with a 7/8-inch port for your existing supply hose and a 1/2-inch port for the bidet hose; it states the valve works with any handheld sprayer using a 1/2-inch hose connection. That is the arrangement on an ordinary American toilet, but read the sizes your own kit lists rather than assuming they match. If your tank is concealed, wall-hung, or fully skirted so you can't see or reach that stub, read our skirted-toilet compatibility guide before ordering.
- Shut off the water and empty the tank. Find the shut-off valve on the wall or floor behind the toilet and turn it clockwise as far as it will go. Then flush and hold the handle down so the tank drains as completely as possible. A tank you didn't fully empty will find you the moment you loosen the supply nut, so give it the extra ten seconds. If the shut-off is corroded, stiff, or clearly hasn't been touched in years, stop here — see the last section of this guide before you force it.
- Disconnect the supply line at the tank, not at the wall. Put your towel and bucket underneath. The nut you want is at the top of the supply line where it meets the fill-valve shank under the tank — Brondell's guide is specific that you disconnect at the fill valve rather than at the wall valve. Steady the shank with one hand so you aren't twisting the fill valve inside the tank, and back the nut off counterclockwise with your wrench. Expect a cup or so of water. Set the supply line aside; you're reusing it exactly as it is.
- Check the washer, then thread the T-valve on by hand. Before anything goes together, look inside the top of the T-valve and confirm the flat rubber washer is seated — Brondell calls this out as a step of its own, and a missing or cocked washer is the most common reason a brand-new install weeps. Thread the T-valve onto the fill-valve shank clockwise, by hand, with the shut-off lever pointing outward where you can reach it. Hand-tight is the target. Brondell warns against over-tightening these connections, and Purrfectzone advises leaving things loose enough to adjust until you've tested.
- Reconnect the supply line to the bottom port. Your original supply line goes back onto the bottom outlet of the T-valve — same nut, same washer, same hand-tightening. Nothing about your toilet's plumbing has changed; the T-valve has simply been inserted into the middle of the connection it already had. If the line now sits at an awkward angle or is stretched taut, don't force it. A braided supply line that is under tension will eventually work a joint loose; a slightly longer replacement line costs a few dollars.
- Connect the spray hose and sprayer head. The braided spray hose goes onto the T-valve's side outlet — the 1/2-inch port — and the sprayer head screws onto the hose's free end. These joints use rubber washers and hand pressure, not torque. Route the hose so it runs down and around rather than doubling back on itself: a hose with a permanent kink in it loses pressure at that point and eventually splits there. Leave enough slack that the sprayer reaches comfortably from the holster to where you'll actually use it, and no more.
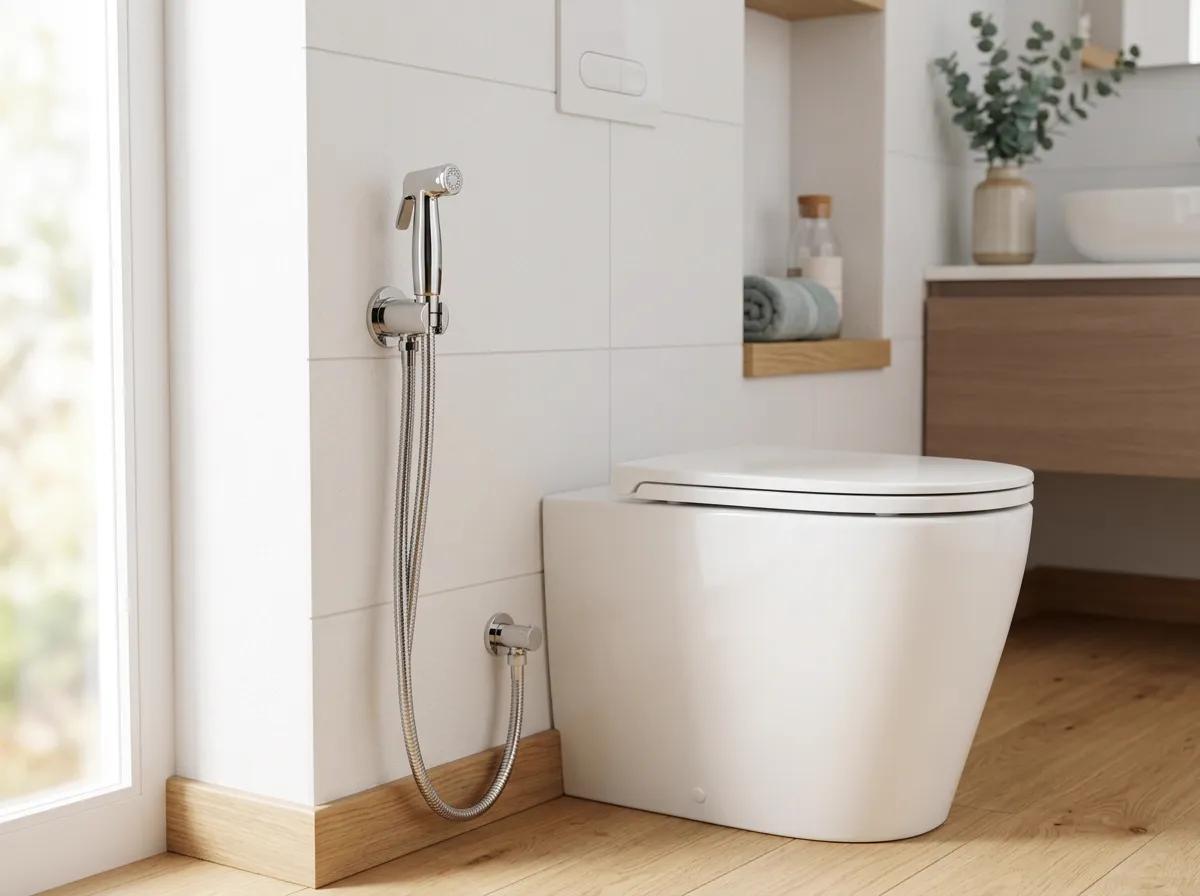
- Mount the holster — tank clip or wall. Most kits give you both options. The tank clip slides over the side of the tank under the lid, needs no drilling, and is the renter-friendly choice; the wall bracket uses the included screws and drywall anchors and is the tidier one. Brondell's guide lists both. Put it where a wet sprayer will drip into the bowl or onto tile rather than onto drywall or a wooden vanity, and close enough that you're not stretching the hose every time you reach for it — a holster mounted too far away is the quiet cause of a hose that starts leaking at the head six months later.
- Turn the water on slowly and hunt for leaks. Open the wall shut-off gradually — counterclockwise — and watch all three T-valve joints as the tank refills: the top onto the fill valve, the bottom to your supply line, and the side to the bidet hose. Then open the T-valve's own shut-off and check the hose ends and the sprayer head. Squeeze the trigger a few times over the bowl to purge air and confirm the head shuts off cleanly when you let go. If a joint drips, close the water, dry it completely, and re-seat the fitting; only reach for plumber's tape if it still weeps after a clean reassembly, which is what both Brondell and Purrfectzone advise.
- Close the T-valve, and keep closing it. This is the step that isn't really an install step. With everything working, close the T-valve's shut-off lever. Brondell states plainly that water pressure remains in the line even after you release the sprayer trigger, and that leaving it live risks leaks or flooding; Purrfectzone gives the same instruction — keep the lever off when the sprayer isn't in use. It's an extra second before and after each use. It is also the only thing standing between a failed trigger seal and a bathroom floor that floods while you're at work.
Why this is the easiest bidet install there is
A handheld sprayer avoids every hard part of the other options. There's no electricity, so the outlet question that stops most bidet-seat projects never comes up. Your toilet seat stays where it is, so bowl shape, bolt spacing and tank clearance don't matter. Nothing is cut, drilled into porcelain, or permanently altered — the only trace left behind is a tee on the fill valve that unscrews in a minute. Those are exactly the constraints that rule out the other options for renters, for bathrooms with no outlet near the toilet, and for anyone unwilling to commit before they know whether they'll like a bidet at all — which is the practical argument for starting here.
The live hose is the real difference from a bidet seat
An electric bidet seat holds its water behind a solenoid valve inside a sealed unit that only opens when you press a button. A handheld holds its water behind a hand trigger at the end of a hose that hangs on a hook, gets bumped, gets pulled, and gets handled wet several times a day. That's why both manufacturers whose install guides we cite here treat closing the T-valve as part of normal use rather than a precaution — Brondell notes the pressure stays in the line after you release the trigger. Nothing about this makes handhelds a bad choice. It does mean the shut-off habit is not optional, and it's a reason to spend a little more on a kit with a brass-core valve rather than the cheapest tee you can find.
You're tapping the cold line, and warm water is a bigger job
The fill valve you just teed into carries cold water, so a standard handheld sprays cold. Most people acclimate, and our cold-versus-warm guide covers who genuinely doesn't. If you want warm, the handheld route is a mixing valve rather than a heater: Brondell sells a hot/cold mixing valve upgrade kit that draws warm water from your sink's hot water supply and describes it as a simple DIY install for hand-held sprayers. Understand what that changes before you commit — it adds a second connection at the sink, a second hose run across or behind the toilet, and it only works if a sink hot line is genuinely within reach. It is also the point where a renter should check with a landlord.
Keep the sprayer in its holster, not in the bowl
A handheld sprayer is a hose connected to your drinking water that can physically reach into a toilet bowl — which is the situation plumbing codes exist to prevent. EPA defines a cross-connection as an actual or potential connection between non-potable sources and potable water that could let non-potable material enter plumbing through backflow, and backflow as any unwanted flow of used or non-potable water back into the potable distribution system. Kohler's guidance for hand-held showers states that plumbing codes require backflow protection, satisfied by an air gap, two independent check valves, or a vacuum breaker; that page is about handshowers and does not mention bidet sprayers, so treat it as the principle rather than a citation about this product. Practically: hang the sprayer up between uses, never leave the head sitting in the bowl, and prefer kits that state they include backflow protection. Our DIY bidet attachment guide covers the mechanism in full.
Where these installs actually go wrong
Almost every failed handheld install is one of five things, and none of them is the sprayer. A missing or misaligned rubber washer inside the T-valve — check it before assembly, as Brondell's guide instructs. A cross-threaded fitting, which feels gritty going on by hand and is the reason to start every connection by hand rather than with a wrench. Over-tightening, which cracks plastic tees and crushes washers instead of sealing them. A kinked hose that loses pressure and eventually splits at the fold. And a holster mounted so far from the toilet that every use puts a tug on the head connection. If you have a drip you can't chase down, our bidet leak guide works through it in order.
The one thing that should stop you: a shut-off valve that won't cooperate
The riskiest moment in this project isn't anything to do with the bidet — it's closing a toilet shut-off valve that hasn't been turned in fifteen years. That's exactly when you find out it's seized, or that it closes but won't fully reopen, or that it starts weeping at the packing nut. If your valve is corroded or takes real force to move, stop and get it replaced before you go any further; snapping one leaves water running with no local way to isolate it. Concealed and wall-hung tanks with no reachable fill-valve connection are the other genuine stop sign. Our guide on when you need a plumber covers both situations honestly, including the cases where the answer is that you don't need one.
Tips & warnings
- Buy the T-valve with the shut-off, even if it means skipping the cheapest kit. It is the part you interact with twice a day for years, and it's what isolates a permanently pressurized hose. A brass-core valve with a lever costs a few dollars more than a plain plastic tee.
- Start every threaded connection by hand. If it doesn't turn smoothly for the first two full rotations, it's cross-threaded — back it all the way off and start again. Reaching for the wrench to overcome resistance is how tees crack.
- Don't pre-wrap everything in plumber's tape. These joints seal on rubber washers, not on threads. Both manufacturer guides treat tape as a fix to try if a joint weeps after reassembly, not a default step — and tape on a washer joint can actually hold the washer off its seat.
- Test with the tank lid off. You want to see the fill valve and both upper joints while the tank refills for the first time. Put the lid back on after you've watched a full fill cycle with no drips.
- Give the whole thing a second look 24 hours later, and again after a week. Slow weeps at a hand-tightened joint often don't show up in the first ten minutes. A dry paper towel laid under the T-valve overnight tells you more than staring at it does.
Frequently asked questions
How do you install a bidet sprayer?
You install a handheld bidet sprayer by teeing it into the toilet's existing water supply, and it takes about ten to thirty minutes with an adjustable wrench. Close the shut-off valve behind the toilet, flush and hold the handle to drain the tank, then unscrew the supply line where it connects to the fill valve underneath the tank. Thread the kit's T-valve onto that fill-valve connection — checking that the flat rubber washer is seated inside it first — with the shut-off lever facing outward. Reconnect your original supply line to the T-valve's bottom port and the braided bidet hose to its side port, then screw the sprayer head onto the hose. Mount the holster to the tank with the included clip or to the wall with the anchors, turn the water back on slowly, and check all the connections for drips. Hand-tighten everything; over-tightening cracks fittings rather than sealing them. No electricity, no plumber and no permanent changes are involved.
Do I need a plumber to install a handheld bidet sprayer?
For the work itself, rarely. Every connection is a threaded fitting with a rubber washer that you tighten by hand — there is no cutting, soldering or new pipe involved, and nothing to do with electricity. The two situations that change that are a toilet shut-off valve that's seized or won't reseal, and a concealed, wall-hung or fully skirted tank where you can't reach the fill-valve connection at all. A warm-water mixing valve teed off a sink hot line is also a bigger job than a standard install. Legally, it depends where you live, because some places limit who may work on the water supply at all. Western Australia's building regulator, for example, lets homeowners carry out only a short list of basic tasks, such as replacing a shower head or a cistern washer, and says all other water supply plumbing work must be done by a licensed plumber or permit-holder. Fitting a T-valve isn't on that list, so check what your state, province or council allows before you start.
What size is the T-valve for a bidet sprayer?
To fit a bidet spray, the T-valve has to match both your toilet's fill-valve connection and your sprayer's hose. On a standard American toilet, the tank end is a 7/8-inch ballcock connection — the same thread your existing supply line uses — with another 7/8-inch port to reconnect that supply line and a smaller port for the bidet hose. Brondell lists its replacement T-valve as 7/8-inch ballcock, 7/8-inch supply hose, and 1/2-inch bidet hose, and states it works with any handheld sprayer using a 1/2-inch hose connection. If your toilet isn't a standard American one, go by the sizes your kit lists rather than assuming these match, and check the hose fitting on your particular sprayer if you're buying a valve separately rather than as part of a kit.
Should I turn off the bidet sprayer's valve after every use?
Both manufacturers whose installation guides we used here say yes. Brondell's guide instructs owners to turn the T-valve off after each use, noting that water pressure remains in the line even once you've released the sprayer trigger, and that leaving it pressurized risks leaks or flooding. Purrfectzone gives the same instruction — keep the lever off when the sprayer isn't in use. Unlike a bidet seat, whose water sits behind a valve inside a sealed unit, a handheld's water sits behind a hand trigger on a hose that gets knocked and tugged daily.
Can I install a handheld bidet sprayer in a rental?
It's the most rental-friendly bidet there is, and that's much of the appeal. The T-valve threads onto a connection your toilet already has, the sprayer holster can clip to the tank instead of being screwed to a wall, and reversing the whole thing means unscrewing the tee and putting your supply line back — a five-minute job that leaves no holes and no trace. If you choose the wall bracket rather than the tank clip, that's the only part that puts screws in drywall, so use the clip if you'd rather not patch anything.
Will a handheld bidet sprayer give me warm water?
Not as installed. You're teeing into the toilet's fill line, which carries cold water only, so a standard handheld sprays at whatever temperature your cold supply is. The handheld route to warm is a mixing valve rather than a heater — Brondell sells a hot/cold mixing valve upgrade kit that draws warm water from the sink's hot water supply and describes it as a DIY install for hand-held sprayers. It only works if a sink hot line is genuinely within reach, and it adds a second connection and hose run to the job.
My new bidet sprayer is dripping — what did I do wrong?
Usually one of three things, and usually not the sprayer. Check first that the flat rubber washer is present and seated squarely inside the T-valve, since a washer that's missing or sitting crooked is the most common cause on a fresh install. Second, check for cross-threading — back the fitting off completely and restart it by hand, which should feel smooth. Third, consider that you may have over-tightened: crushing a washer or cracking a plastic tee produces a leak that more tightening makes worse. Only after a clean reassembly should you try two wraps of plumber's tape on the threads.
Sources
- Brondell — How to Install a Hand-Held Bidet Sprayer
- Brondell — Hand-Held Bidet Sprayer Replacement T-Valve (specifications)
- Purrfectzone — How to Install a Handheld Bidet Sprayer
- Brondell — Hot/Cold Mixing Valve Upgrade Kit for Bidet Sprayers
- Kohler — Handshower Backflow Prevention Devices
- US EPA — Drinking Water Distribution System Tools and Resources (cross-connection and backflow definitions)
- Government of Western Australia, Building and Energy — Plumbing work in your home