How to replace a toilet seat
Replacing a toilet seat is one of the most beginner-friendly bathroom repairs you can do. No plumbing experience required, no water shut-off needed, and the whole job usually takes under 30 minutes. Whether your current seat is cracked, wobbly, stained beyond cleaning, or you just want an upgrade to a soft-close or bidet seat, the process is the same.
The trickiest part of most toilet seat swaps is not the installation — it is removing the old seat, especially if the bolts are corroded or rusted solid. This guide walks you through the full job from start to finish, including what to do when bolts refuse to budge. We also cover the one mistake that turns a quick DIY win into an expensive disaster: overtightening the new seat bolts and cracking the porcelain bowl.
Before you buy a replacement, measure your bowl. Round bowls are roughly 16.5 inches from bolt holes to the front rim; elongated bowls are closer to 18.5 inches. The bolt holes are almost always 5.5 inches apart center to center. Match the shape and you will not have a fitment problem. When in doubt, bring the old seat to the store or check the model number on the underside of the tank lid.
Need a new seat to install? See our top picks.
See our picks →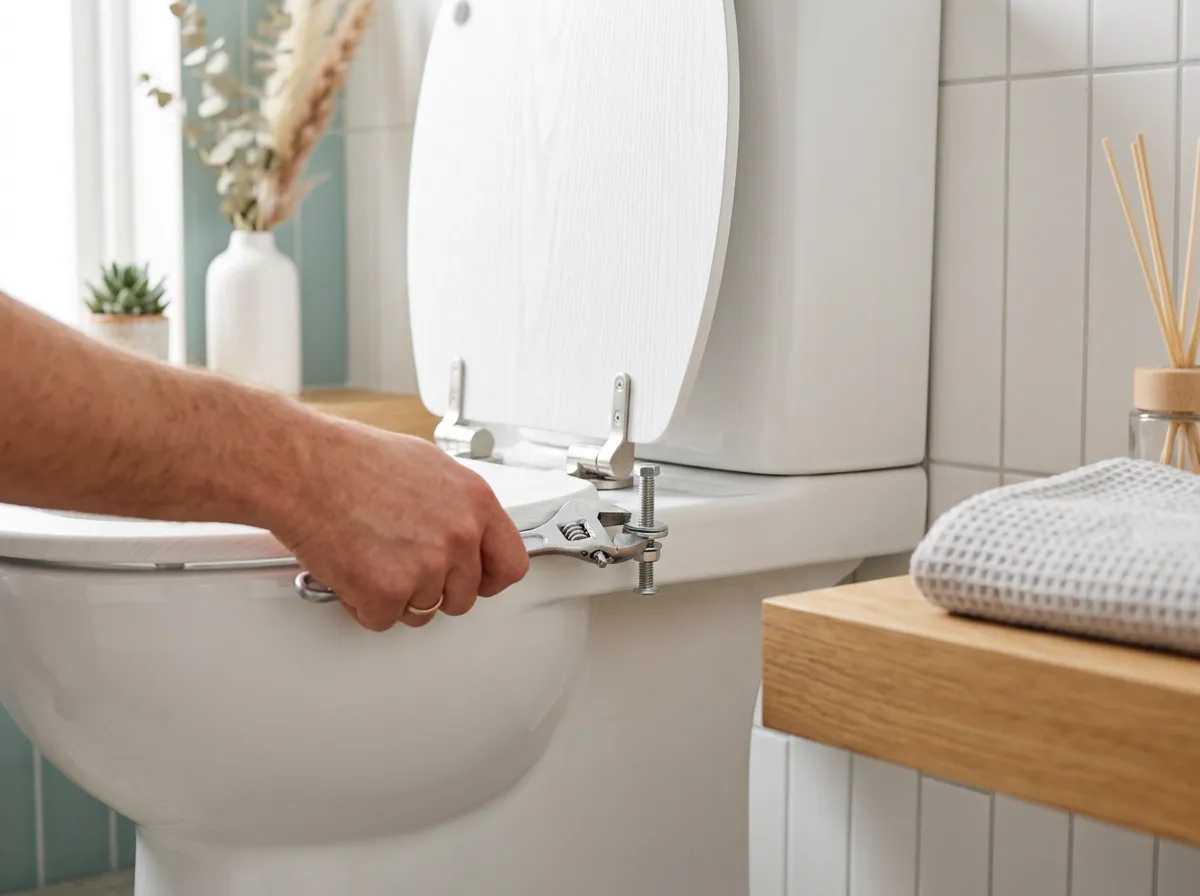
What you'll need
- Flathead screwdriver (for prying plastic bolt caps)
- Phillips-head screwdriver
- Adjustable wrench or channel-lock pliers
- Penetrating oil (WD-40 Specialist Rust Release or PB Blaster — NOT standard WD-40 lubricant)
- Rubber gloves
- Old rags or paper towels
- Tape measure (to confirm bowl shape before buying)
- Mini hacksaw or oscillating tool with metal blade (last resort for fused bolts)
- All-purpose bathroom cleaner and a scrub brush or old toothbrush
- Replacement toilet seat (confirm round vs elongated fit before purchasing)
Step by step
- Measure before you buy. From the center of the bolt holes to the front rim of the bowl, measure the length. Round bowls run about 16.5 inches; elongated bowls about 18.5 inches. The bolt holes should be 5.5 inches apart center to center on virtually every standard toilet. Buy the seat that matches your bowl shape. Installing a round seat on an elongated bowl (or vice versa) will leave gaps that collect bacteria and make the seat rock.
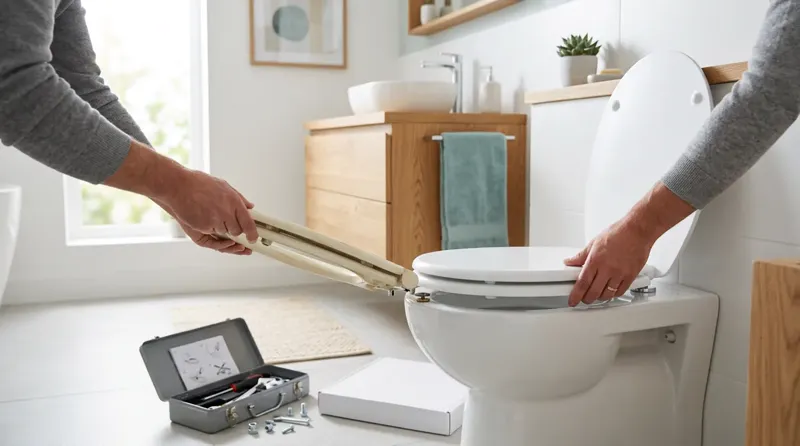
- Gather your tools and put on gloves. Rubber gloves are not optional — you will be reaching under the toilet rim and handling hardware that has years of grime on it. Lay out your tools within reach before you start. Keep a rag handy to wipe surfaces as you work.
- Pop the bolt caps open. At the back of the seat, on either side of the hinges, you will see two plastic caps. Slide a flathead screwdriver into the slot or notch on each cap and pry upward. They should snap open. Some caps are hinged; others pop completely off. Set them aside — you will not need them for the new seat, which comes with its own hardware.
- Assess the bolts before touching them. Look at the exposed bolt tops. If they are plastic and look intact, a Phillips-head screwdriver is all you need. If they are metal and show rust, orange staining, or mineral buildup, stop and move to the penetrating oil step before trying to turn anything. Forcing a corroded bolt without preparation often just snaps the head off and makes the job much harder.
- Apply penetrating oil to rusted bolts (if needed). Spray or drip penetrating oil generously onto the bolt threads — both on top where the screwdriver goes and underneath the bowl where the nut sits. Let it soak for at least 15 to 30 minutes. For heavy corrosion, apply a second dose and wait another 15 minutes. Do not rush this step. Penetrating oil works by wicking into microscopic gaps in the rust and breaking the bond chemically. WD-40 standard formula is a lubricant, not a rust penetrant — use PB Blaster, WD-40 Specialist Rust Release, or a similar purpose-made penetrant.
- Loosen and remove the old seat bolts. Hold the nut under the bowl with pliers or one hand to keep it from spinning, and turn the bolt head counterclockwise with your screwdriver. Go slow and steady. If the nut is plastic it may just spin in place — grip it firmly with pliers. If the bolt turns freely but the seat does not lift, the nut may have separated; reach under and unthread it by hand. Once both bolts are out, lift the seat and hinges straight up off the bowl.
- Cut the bolts as a last resort. If the bolts are completely fused with rust and will not turn after soaking, a mini hacksaw is the answer. Position the blade against the bolt shank just above the nut, underneath the bowl. Cut through the bolt — you are sacrificing the hardware, not trying to save it. Work slowly to avoid scratching the porcelain. An oscillating multi-tool with a metal blade is faster if you have one. Safety glasses are worth putting on for this step. Once cut, the seat and remaining bolt stub lift away easily.
- Clean the mounting area thoroughly. With the old seat off, clean around the bolt holes and the entire hinge mounting area with bathroom cleaner and a scrub brush or old toothbrush. Years of buildup collect in that zone and are much easier to clean now than after the new seat is installed. Rinse and dry the area completely before proceeding.
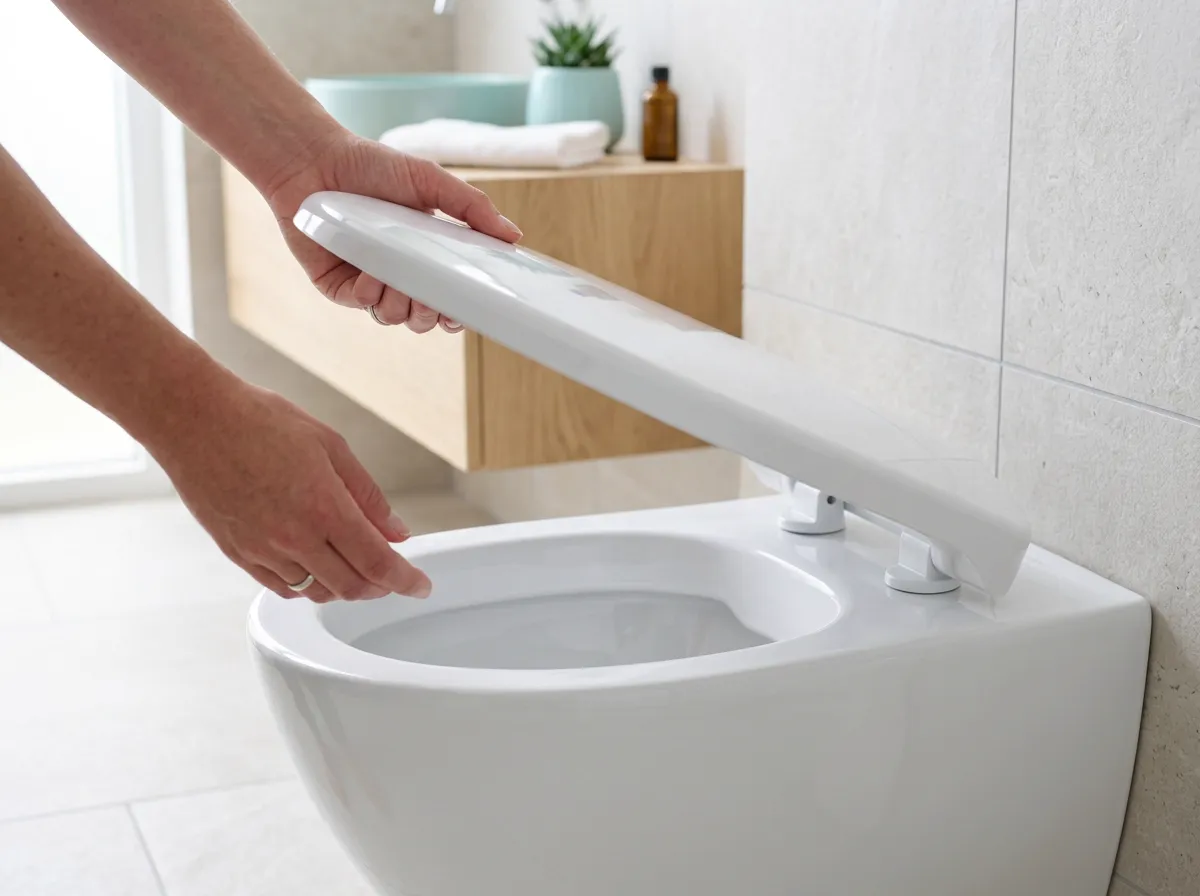
- Position the new seat on the bowl. Set the new seat on the bowl and align the hinge posts with the bolt holes. The seat should sit centered, with equal overhang on both sides, and the front edge flush or slightly inside the front rim of the bowl. Most modern seats have adjustable hinge posts that let you slide the seat forward or back slightly to dial in the fit before you lock it down.
- Thread in the new bolts. Drop the bolts through the hinge posts and into the bolt holes. From underneath, thread on the nuts — usually plastic on modern seats — by hand. Do not use a wrench yet. Just get them snug enough that the seat does not slide around.
- Tighten the bolts — stop before you think you should. This is the most important step. Porcelain is hard but brittle — it does not flex, so any force above what is needed to seat the hardware goes directly into the risk of cracking the bowl. Tighten each bolt a quarter-turn at a time, alternating sides to keep pressure even. Stop when the seat no longer shifts or rocks when you push on it from different angles. Give each nut one final quarter-turn past that point, then stop. If the seat included plastic washers, make sure they are seated between the nut and the underside of the porcelain — these distribute the load and reduce crack risk. You should not need a wrench more than finger-tight plus a quarter-turn with pliers for most plastic hardware.
- Snap the caps closed and test the seat. Snap the plastic bolt caps down over the hinges to cover the hardware. Sit on the seat and shift your weight in different directions to confirm it does not rock or slide. If a soft-close mechanism is included, open and close the seat a few times to confirm it lowers smoothly. You are done.
Tips & warnings
- Do not use standard WD-40 on rusted bolts — it is a lubricant, not a penetrant. Use PB Blaster, WD-40 Specialist Rust Release, or a similar rust-penetrating formula and give it at least 15 minutes to work before applying any force.
- Overtightening is the number one DIY mistake on this job. A cracked toilet bowl means a full toilet replacement — a job that can cost several hundred dollars in parts and labor. Snug plus a quarter-turn is enough. If the seat still wiggles after that, check that the hinge posts are fully seated in the bolt holes before tightening further.
- If your toilet uses a top-tightening seat (hardware tightens from above with no under-bowl access, common on one-piece toilets and tight-clearance installs), the process is slightly different — a long screwdriver or a top-tightening wrench tool handles the whole job from above. Check the new seat packaging for which type you have.
- Some older toilets have non-standard bolt spacing. Before discarding the old seat, measure the center-to-center distance between the bolt holes. Standard is 5.5 inches. If yours differs, you will need a seat with adjustable hinges.
- Soft-close hinges are worth the modest price upgrade. They virtually eliminate the loud seat-slam and reduce stress on the hinge posts over time, which means the seat stays tight longer.
Frequently asked questions
How do I know if I need a round or elongated toilet seat?
Measure from the center of the bolt holes straight to the front rim of the bowl. Round bowls measure roughly 16 to 17 inches; elongated bowls measure roughly 18 to 19 inches. You can also look at the bowl from above — round bowls are nearly circular, elongated bowls are noticeably oval. The shape is stamped or molded into most toilet lids near the tank, or you can find it in the model number on the inside of the tank.
My bolt is turning but nothing is loosening — what is happening?
The bolt is spinning freely because the nut underneath is also spinning. This usually happens with plastic nuts that have nothing to grip against. Reach under the bowl and hold the nut firmly with pliers while you turn the bolt from above. If there is no room to get pliers in, wrap a rubber band around the nut for extra grip and try holding it by hand while a second person turns the bolt.
How long should I let penetrating oil soak before I try to remove a stuck bolt?
At minimum 15 minutes. For heavy rust or bolts that have not been touched in years, 30 minutes is better — or apply the oil, wait 20 minutes, apply a second coat, and wait another 20. Heat from a hair dryer on a low setting (1 to 2 minutes per bolt) can help the oil wick in faster. Do not use a torch or open flame anywhere near a toilet.
Can I crack the toilet bowl by tightening the seat bolts too much?
Yes, and it happens more often than people expect. Porcelain is strong under normal use but brittle under concentrated point pressure. Overtightened bolts can crack the area around the bolt holes, and that crack can spread. Always use the plastic washers included with the seat, tighten evenly side to side, and stop at snug plus a quarter-turn. If the seat still wobbles, check alignment before adding more torque.
Do I need to turn off the water to replace a toilet seat?
No. Replacing a toilet seat does not involve the water supply or the tank or bowl connections at all. The seat attaches only to the top of the porcelain bowl via two bolts. You do not need to shut off the water, flush the tank, or touch any plumbing.
My new seat wiggles side to side even after tightening. What should I check?
First, confirm the hinge posts are fully dropped into the bolt holes — they should sit flush, not riding up on the rim of the hole. Second, check that you are using the correct washers in the correct order (typically: bolt through hinge post, then through hole, then washer, then nut from below). Third, some seats have an adjustable hinge that must be locked in position before the seat will stay centered — look for a locking tab or screw on the hinge assembly itself.