How to fix a loose toilet seat
A loose or wobbly toilet seat is one of the most common bathroom annoyances, and in most cases it takes less than 15 minutes to fix with tools you already own. The seat shifts because the two bolts that clamp it to the bowl have gradually worked loose — normal vibration from everyday use slowly backs the nuts off the threads. Left alone, the problem gets worse: the mounting holes in the seat widen, the porcelain rim can chip, and eventually the seat may crack at the hinges entirely.
There are two basic mounting styles. Top-mount seats have bolt heads visible on top of the hinge — you tighten from above. Bottom-mount seats hide the nut below the bowl rim, which means you need one hand underneath while the other works the screwdriver. Either way the repair is the same core idea: snug the nut down, add rubber washers or bushings if the holes have enlarged, and replace the seat if the hardware or the plastic is genuinely worn out.
This guide covers both mounting styles, what to do when the bolt just spins in place, how a seat-tightening kit solves chronic looseness, and the signs that tell you a repair is no longer worth the effort and a new seat is the right call. No plumber needed for any of this — but a few technique details matter, especially around porcelain: overtightening a bolt against a ceramic bowl can crack it, so knowing when to stop is just as important as knowing how to start.
Seat too far gone? See our top replacements.
See our picks →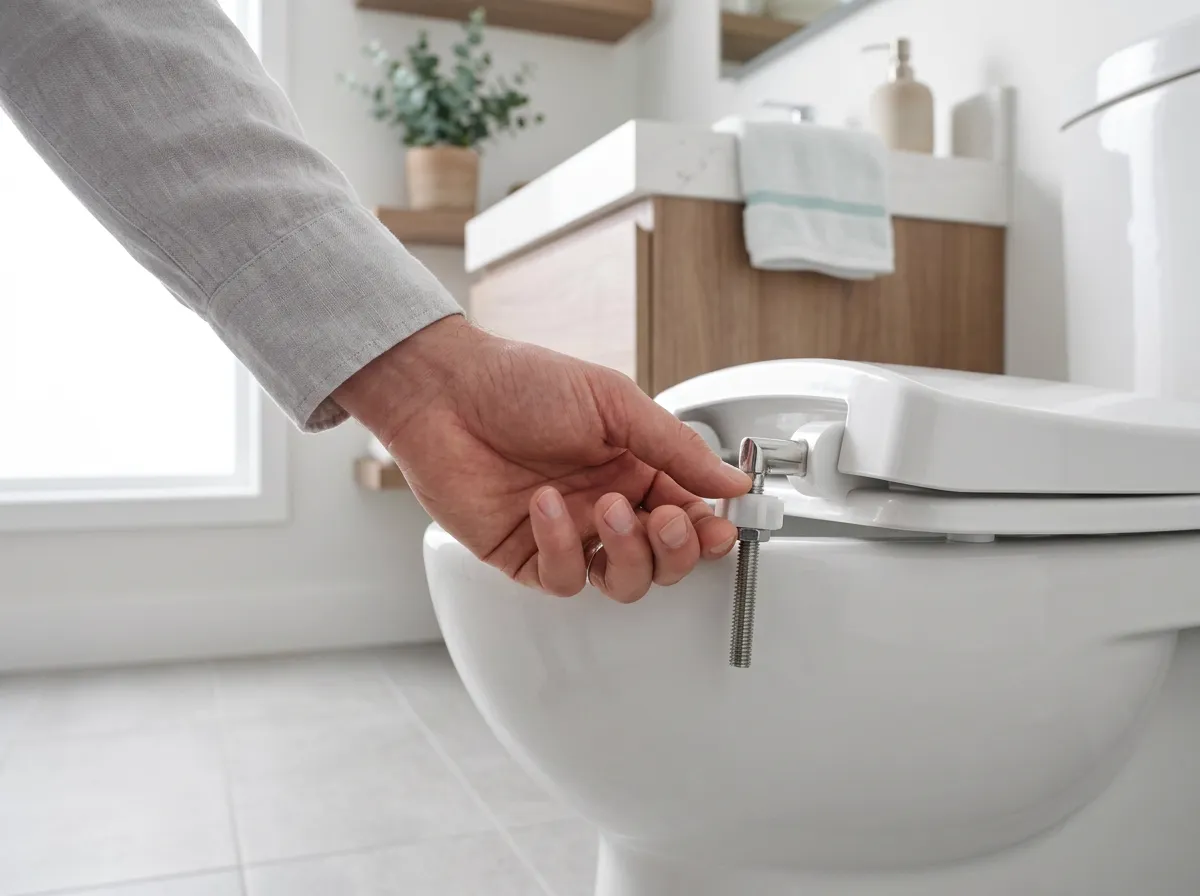
What you'll need
- Flathead screwdriver
- Adjustable pliers or open-end wrench (typically 1/2 in or 9/16 in)
- Rubber or latex gloves
- Flashlight or headlamp (for seeing under the bowl rim)
- Toilet seat tightening kit with rubber bushings (optional, for persistent wobble)
- Replacement seat (only if current seat is cracked or worn out)
Step by step
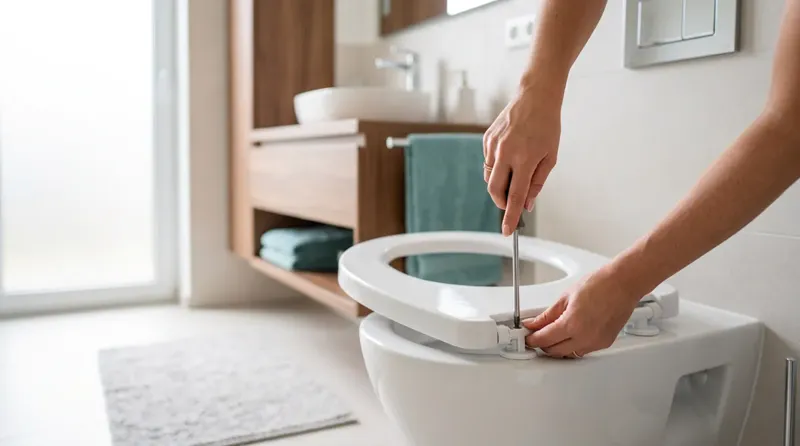
- Lift the hinge caps and identify your mounting type. Most seats have small plastic caps that snap down over the bolt heads at the back of the seat. Pry them open gently with a flathead screwdriver — do not force them or they will crack. Look at what is exposed. If you see a bolt head you can turn from above, you have a top-mount seat. If the bolt goes straight through with nothing to grip on top, you have a bottom-mount seat and will need to reach under the bowl rim to hold the nut.
- Check the condition of the bolts and hardware. Before tightening anything, look closely at the bolts, nuts, and washers. Metal bolts that are visibly rusted or corroded are likely to snap if you apply force — in that case, plan to replace the whole seat rather than fighting corroded hardware. Cracked plastic bolts or a seat that has visibly enlarged oval holes at the hinges are also signs that tightening alone will not hold. If everything looks intact and just loose, proceed.
- Tighten a top-mount seat from above. Insert your flathead screwdriver into the slot on the bolt head and turn clockwise. Hold the seat and lid in the correct position as you tighten so they sit centered on the bowl. Tighten each bolt a little at a time, alternating sides, so clamping pressure builds evenly. Stop when the seat no longer shifts — do NOT keep turning past firm resistance. Porcelain can crack if you clamp too hard against the bowl, and plastic bolt housings strip easily.
- Tighten a bottom-mount seat with two hands. Put on gloves and reach under the bowl rim with one hand. Feel for the hex nut or wing nut threaded onto the bolt. Hold it steady with your fingers or with pliers while you turn the bolt clockwise from above with your screwdriver. The key is that both pieces must move together — if you turn the bolt without holding the nut, the nut just spins and nothing tightens. Wing nuts can often be finger-tightened plus a quarter-turn snug with pliers. Check for porcelain contact: stop the moment resistance feels firm.
- Deal with a spinning bolt that will not grip. If the bolt turns but the seat stays loose, the nut is spinning freely underneath rather than threading down. Hold the nut firmly with pliers from below, then drive the screwdriver from above. Alternatively, some seats have a plastic anchor that sits in the porcelain mounting hole — if that anchor is cracked or too worn to bite, no amount of tightening will help. Replace the seat.
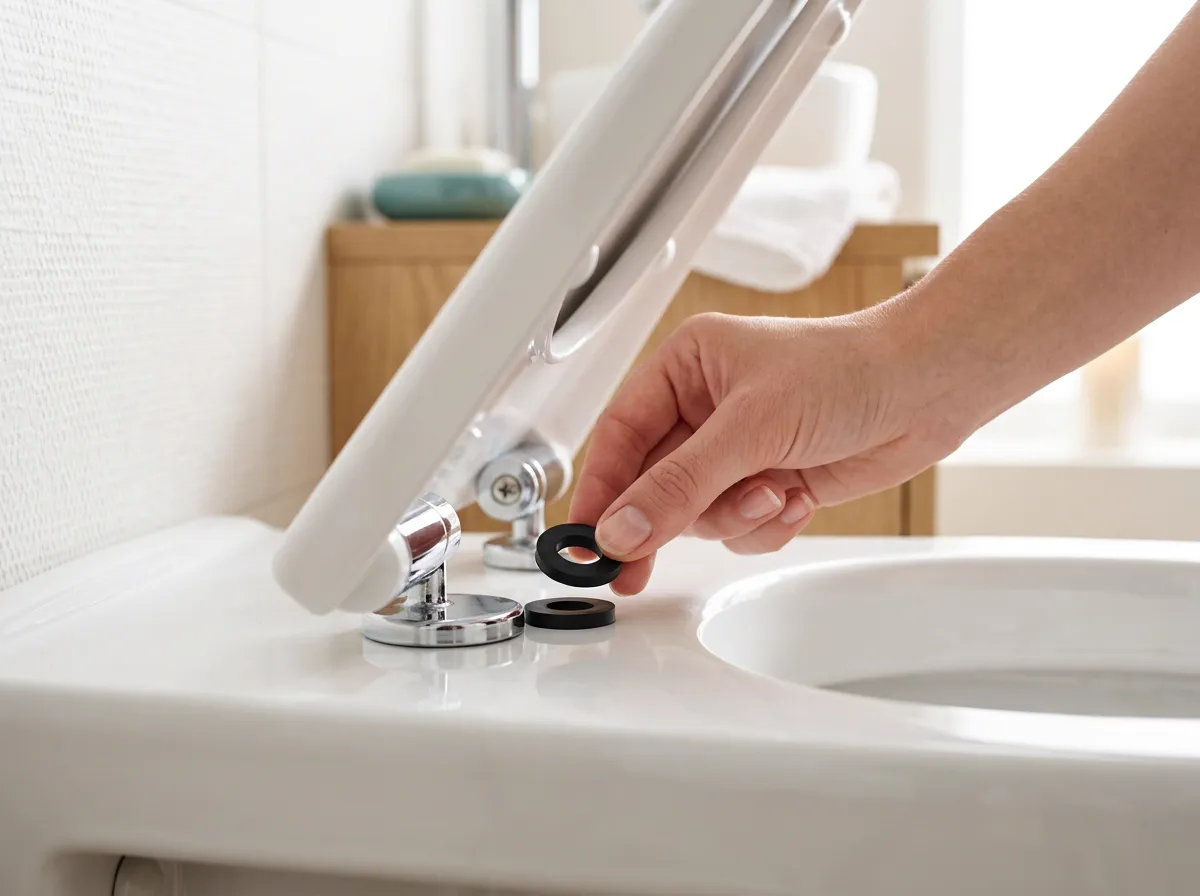
- Add rubber washers or bushings for a lasting fix. If the seat tightens but loosens again within a few days, the mounting holes in the seat have likely widened with wear. Pick up a toilet seat tightening kit at any hardware store (typically under $10). These kits include rubber bushings that slide onto the bolt before it goes through the seat, filling the gap between the bolt shank and the enlarged hole. Install each bushing with the tapered end facing up toward the seat, then reassemble and snug the nut down. The rubber grips the porcelain and dampens movement, so the seat stays tight much longer.
- Replace the seat if it is cracked, stained, or won't stay tight. A seat that has cracked plastic — especially at or near the hinges — cannot be safely tightened; cracks harbor bacteria and will spread. A seat you have tightened two or three times in the past year has worn-out mounting points and will not hold. Standard toilet seats cost $20 to $60 at hardware stores and take about 10 minutes to swap out. Measure your bowl (round vs. elongated) before buying. Replacement is also the right move if the finish is permanently stained, yellowed, or pitted — there is no practical repair for degraded seat material.
- Close the caps and test. Snap the hinge caps back into place. Sit on the seat and shift your weight side to side and forward — the seat should feel completely solid. If any movement remains, check whether one bolt is looser than the other and snug it. Run your finger along the underside where the bolt contacts the porcelain to confirm you have not cracked or chipped the rim during tightening.
Tips & warnings
- Never overtighten against porcelain. Ceramic toilet bowls crack under point load. Stop tightening the moment the seat stops moving — firm hand pressure is enough. Using a wrench for the final snug is fine; leaning on it is not.
- Metal bolts on older seats sometimes seize with rust and snap when you apply torque. If a bolt looks brown or corroded, soak it with a penetrating lubricant for 10 minutes before attempting to turn it. If it still won't budge, plan on replacing the whole seat — the bolt will not hold reliably anyway.
- If you are replacing the seat on a very old toilet, check the bowl's mounting hole spacing (typically 5.5 inches center to center, which is standard) before buying. Some vintage or non-standard bowls take a different spread.
- Seat tightening kits work on most standard two-bolt toilet seats. If your toilet uses a single-post or rear-anchor hinge system, check the manufacturer's replacement hardware — generic kits may not fit.
- Cracks in the seat, no matter how small, are a hygiene concern. A cracked plastic or wood-composite seat cannot be sanitized fully. If you see a crack, replace the seat even if it feels sturdy.
Frequently asked questions
How do I know if my toilet seat is top-mount or bottom-mount?
Lift the hinge caps at the back of the seat. Top-mount seats expose a bolt head you can drive with a screwdriver from above. Bottom-mount seats show only the shaft of the bolt with nothing to turn — tightening requires holding the nut from below the bowl rim. Most modern seats sold in the US are top-mount with plastic quick-release hinges.
Why does my toilet seat keep coming loose even after I tighten it?
The most common reason is that the mounting holes in the seat have widened over time, so the bolt has room to rock. A rubber bushing kit from the hardware store fills that gap and keeps the bolt from shifting. If you have used bushings and the seat still loosens within a few weeks, the hinge plastic itself is worn out and the seat needs to be replaced.
The bolt just spins and nothing tightens. What do I do?
The nut underneath is spinning with the bolt instead of gripping the threads. Reach under the bowl rim and hold the nut still with pliers or your fingers while you turn the screwdriver above. If the plastic anchor housing inside the mounting hole is cracked or stripped, it will never grip — replace the seat.
Can I crack my toilet bowl by overtightening the seat bolts?
Yes. Porcelain is strong under distributed load but can crack under the concentrated pressure of an overtightened bolt. Tighten only until the seat stops moving and you feel firm resistance. Do not use a power drill or a long-handled wrench for extra leverage — hand tools with moderate pressure are all that is needed.
My toilet seat wobbles side to side but the bolts seem tight. What's going on?
Side-to-side wobble usually means the seat is shifting laterally on the bolt rather than the bolt being loose. Look for seat stabilizers — small rubber pads or bumpers that grip the inside edge of the bowl rim. Some tightening kits include these. Stick-on rubber bumpers are an inexpensive fix; press them to the underside of the seat near the front edge where contact with the rim is greatest.
When should I call a plumber instead of fixing this myself?
You do not need a plumber for a loose toilet seat — it is a straightforward DIY repair. The only time a professional is warranted is if you notice the toilet bowl itself is cracked, the toilet rocks on the floor (a different problem involving the wax ring or floor flange), or water is leaking at the base. A loose seat is hardware, not plumbing.